
Connecting MCP to the StateTick Ecosystem
The StateTick MCP lets an AI assistant work inside your project — reading it, editing it and, if you allow it, operating the machine. This tutorial connects it to Claude Code, one step at a time: opening the AI Agent in StateTick, choosing what the agent may do, registering it with Claude, and confirming the connection from the command prompt.
Before you start: you need StateTick Studio installed and Claude Code installed on the same PC. If typing claude in a command prompt does nothing yet, install Claude Code first by following Anthropic's setup guide, then come back here.
Step 1 — Open StateTick and the AI Agent
- Start StateTick Studio and open the project you want the agent to work on.
- In the menu bar, click Device.
- Choose AI Agent…. The AI Agent window opens.
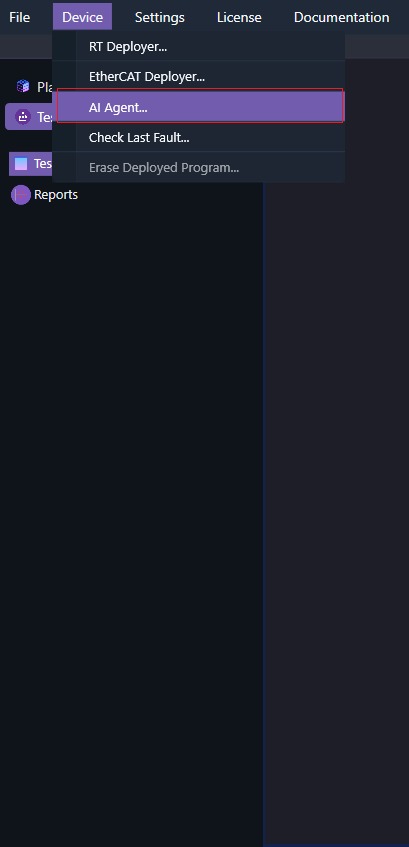
Step 2 — Read the AI Agent window
The window has three numbered sections. Work through them top to bottom.
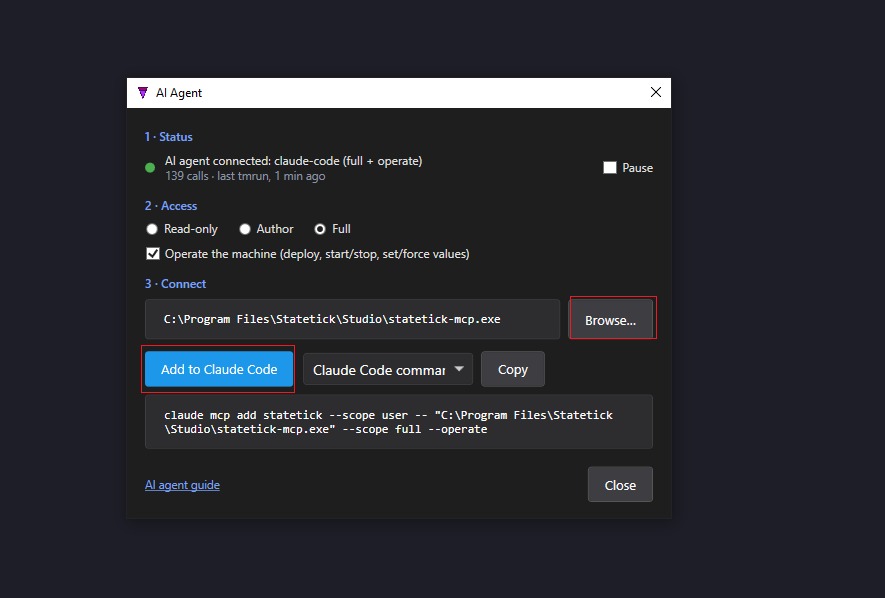
1 · Status
Shows whether an AI agent is currently connected. A green dot with AI agent connected means Claude Code is talking to StateTick; the line underneath counts the calls made and when the last one happened. The first time you open the window nothing is connected yet — that is expected.
The Pause checkbox stops the agent from doing anything without disconnecting it. Tick it whenever you want to take back control for a moment.
2 · Access — set the permissions
Choose how much the agent may do in your project:
| Setting | What the agent can do |
|---|---|
| Read-only | Look at the project and answer questions about it. It cannot change anything. |
| Author | Read and edit the project — create and change its contents. |
| Full | Everything the agent is allowed to do in the project. |
Separately, the Operate the machine (deploy, start/stop, set/force values) checkbox decides whether the agent may act on a running controller. Leave it unticked unless you really want the assistant to deploy, start and stop the program, or set and force live values.
Start small. Read-only is a safe first setting while you get used to the agent. Move up to Author or Full when you want it to build things for you, and only tick Operate the machine when nobody can be hurt by the machine moving.
The access you choose here is written into the command in the next section (for example --scope full --operate). If you change it later, register the MCP again so Claude Code picks up the new setting.
3 · Connect
The path field shows where the StateTick MCP server is installed — normally:
C:\Program Files\Statetick\Studio\statetick-mcp.exeIf the field is empty, or you installed StateTick somewhere else, click Browse… and select statetick-mcp.exe in your StateTick Studio install folder.
Step 3 — Add StateTick to Claude Code
There are two ways to register the MCP. Use whichever you prefer — the result is the same.
Option A: one click
Click Add to Claude Code. StateTick registers the MCP with Claude Code for you, using the path and access you selected.
Option B: copy the command
Leave the dropdown on Claude Code command, click Copy, and paste the command into a command prompt. It looks like this:
claude mcp add statetick --scope user -- "C:\Program Files\Statetick\Studio\statetick-mcp.exe" --scope full --operateThe first --scope user registers StateTick for your Windows user, so it is available in every folder you start Claude from. The options after the path are the access you chose in section 2.
Step 4 — Make sure StateTick is running before you open the command prompt
This is the step most people trip over. Claude Code connects to its MCP servers once, when it starts. It does not notice an MCP that was added, or a StateTick that was started, after it was already running.
So before you continue, check:
- StateTick Studio is open, with your project loaded.
- The StateTick MCP has been added (Step 3), and the AI Agent window shows the path to
statetick-mcp.exe. - Pause is not ticked in the AI Agent window.
Already had a command prompt open? Close it and open a new one. A command prompt — or a Claude session — that was started before the MCP was added will not see StateTick. If Claude is running, type /exit, close the window, and start again from Step 5.
Step 5 — Open the command prompt and start Claude
- Press Win, type cmd and press Enter to open a new Command Prompt.
- Optionally,
cdinto the folder you want Claude to work in. - Type
claudeand press Enter.
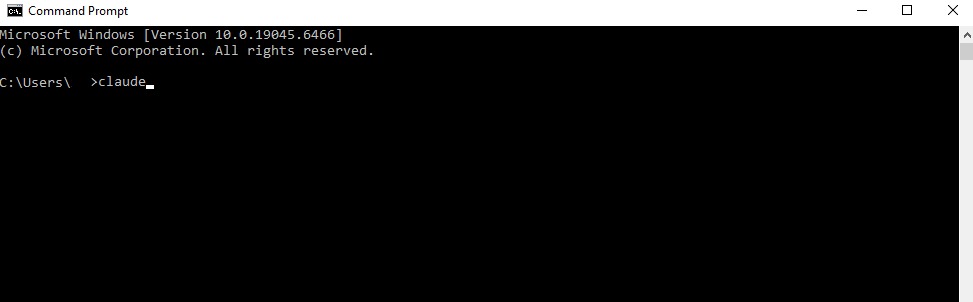
claude typed at the prompt.The first time, Claude Code may ask you to sign in and to trust the folder you started it in. Follow the prompts until you reach Claude's input line.
Step 6 — Check the link with /mcp
At Claude's prompt, type /mcp and press Enter. This opens Manage MCP servers.
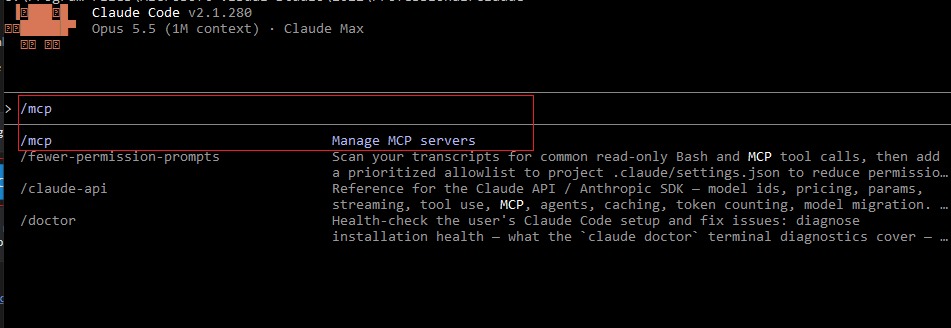
/mcp — the suggestion list shows Manage MCP servers.Under User MCPs you should see statetick marked ✓ connected, followed by the number of tools it offers.
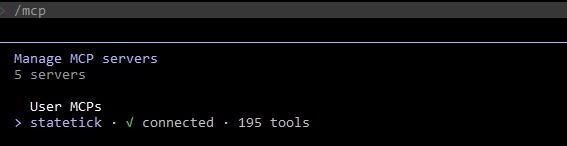
statetick · ✓ connected — Claude Code can now reach StateTick.Press Esc to close the list. Back in StateTick, the AI Agent window's Status section shows a green dot and AI agent connected once Claude is talking to it.
Step 7 — Try it
Ask Claude something about the project open in StateTick, for example:
- “List the equipment in this project and the interfaces each one uses.”
- “Which states does the main FSM have, and what conditions move it between them?”
- “Add a global Int called PartCount with a default of 0.” (needs Author or Full)
Claude asks before using a StateTick tool the first time; approve it to let the call through. Keep an eye on the call counter in the AI Agent window — it goes up with every request.
Troubleshooting
| What you see | What to do |
|---|---|
statetick is not listed under /mcp | The MCP was not registered, or Claude was started before it was. Repeat Step 3, then close the command prompt, open a new one and run claude again. |
statetick is listed but failed or not connected | Check StateTick Studio is open and the path in the Connect section points at a real statetick-mcp.exe (use Browse to fix it). Then exit Claude with /exit, restart the command prompt and start claude again. |
'claude' is not recognized | Claude Code is not installed, or the command prompt was opened before it was. Install it, then open a new command prompt. |
| Connected, but the agent refuses to change anything | Access is set to Read-only, or Pause is ticked. Raise the access level, register again (Step 3) and restart Claude. |
| The agent cannot deploy or start the machine | Operate the machine is unticked. That is the safe default — tick it only if you want this, then register again and restart Claude. |
The rule behind almost every fix: StateTick first, MCP added second, a fresh command prompt and claude last.
Where to go next
The MCP works on the same project model you build by hand. If you are new to it, the basics tutorials explain what the agent will be reading and writing: Global Variables, Equipment and States. Everything the agent creates is ordinary project content, so you can review it under version control like any other change.
Try it in StateTick
Connect your AI assistant once, and let it read, build and test across the whole StateTick ecosystem.
Get Started →